Your wall stood through winter, then spring rains pushed it two inches off vertical. You did not have a structural problem at first; you had a drainage problem that became one. Retaining wall construction drainage reinforcement is the discipline of moving water away from the back of the wall before soil pressure has a chance to load the structure it was never designed to carry. Drainage reinforcement in concrete and masonry walls means adding a free-draining gravel column, a perforated pipe, and weep outlets sized to the slope and soil you actually have. Done right, it is the difference between a wall that shrugs off a storm and one that walks down the hill.
What Retaining Wall Drainage Reinforcement Actually Does (and Why Most Failures Start Here)
A concrete or masonry wall is built to resist lateral earth pressure. That pressure roughly doubles when the soil behind it gets saturated, so the wall is suddenly asked to hold back something it was never sized for. The job of the drainage system is to keep that soil at or below its natural moisture content so the pressure you engineered stays the pressure you get. Hydrostatic pressure is the silent load that builds up when water has nowhere to go, and it is the number one reason otherwise well-built concrete and masonry walls lean, crack, or rotate.
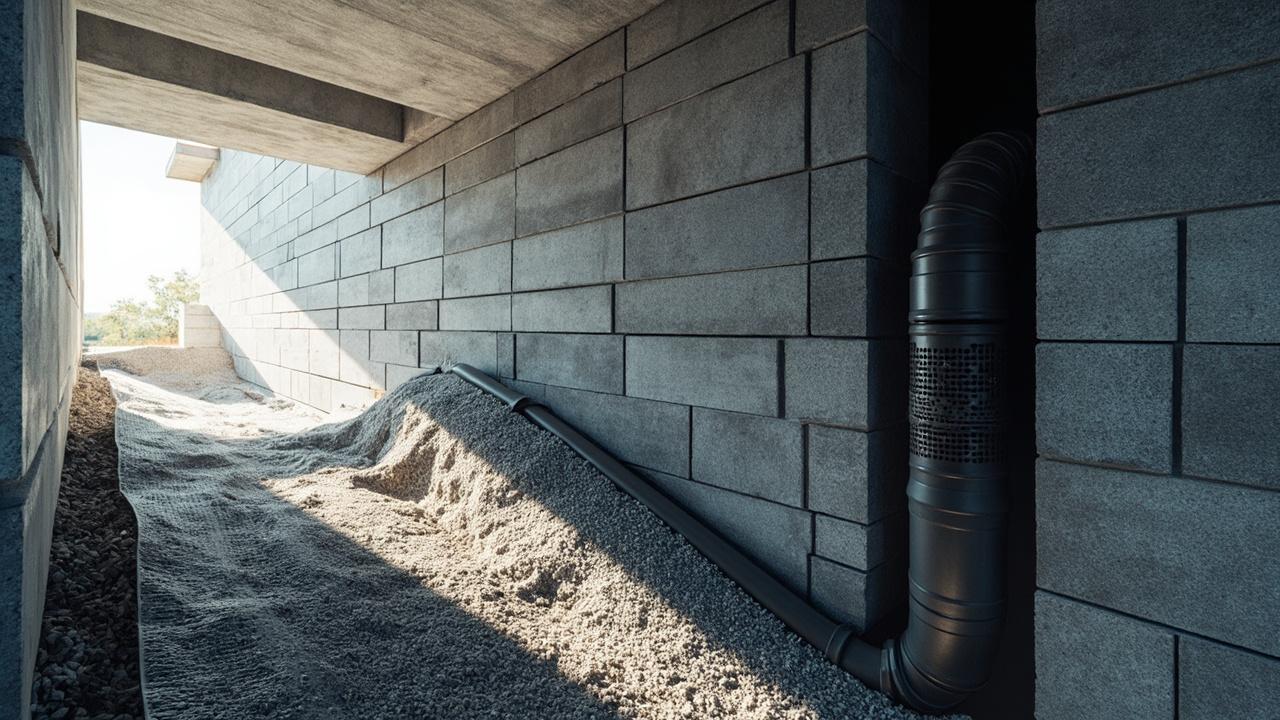
In practice, drainage reinforcement is a stack of four things, not one. First, a layer of free-draining gravel directly behind the wall, typically a #57 stone or equivalent, in a column at least 300 mm wide. Second, a perforated drain pipe (often 100 mm diameter) at the base of that gravel column, slotted side down or wrapped in filter fabric. Third, weep holes or a slotted drain outlet every 2 to 3 metres through the wall face, to give water a visible exit. Fourth, a geotextile filter fabric between the gravel and the native soil, so fines do not migrate into the stone and clog the system over the first decade.
Here is the part people skip. The system has to outlast the wall, not just outlast the pour. A pipe that is not truly perforated, gravel that is too fine, fabric that is missing or torn, and outlets that are above grade or blocked by landscaping are the four failure modes I see over and over. Skipping one of them is not a small thing; it is why drainage reinforcement is not really a “nice to have” step. It is half the structure.
How the Numbers Behind the Wall Actually Work
The geometry behind a retaining wall is more predictable than most people think. The water that gets into the soil has to come out somewhere, and the rate at which it leaves is controlled by the permeability of the gravel column and the slope of the pipe. A clean #57 stone has a permeability on the order of 0.1 to 1 cm per second, roughly a thousand times faster than a typical clay-loam backfill. That ratio is the whole reason the gravel column works; it gives water a faster path sideways and down than the soil does straight back into the wall face.
Sizing the pipe and spacing the outlets follows a simple rule of thumb for residential and light commercial walls. For walls up to about 1.5 m tall with normal soil, a 100 mm perforated pipe at the base, sloped at a minimum of 1 to 2 percent toward the outlet, is enough to handle a typical storm. Weep holes or slotted outlets are spaced about 2 to 3 metres apart along the wall, and each one should daylight at least 150 mm above finished grade so they cannot be buried by landscaping, mulch, or settled soil over the first season.
Load and span matter too. Reinforced concrete walls taller than about 1.8 m, or any wall holding a surcharge (a driveway, a pool, a steep slope above), should have a geogrid or reinforcement mat extending back into the soil 0.6 to 0.8 times the wall height. That is not a drainage detail per se, but it changes how much hydrostatic head the system has to relieve. If the wall is carrying a slope above it, even good drainage is not a substitute for proper structural design. For taller or loaded walls, consult a structural engineer; the numbers above are for sizing the drainage layer, not the wall itself.
Which Drainage Setup Fits Your Conditions (Conditional Guidance)
The right drainage reinforcement depends on soil, slope, and how much water the site actually moves. A wall in sandy soil with a gentle slope behaves nothing like a wall in heavy clay-loam on a steep lot. The table below matches the most common scenarios to the drainage stack that tends to perform.
| Site condition | Drainage stack | Key detail |
|---|---|---|
| Sandy soil, gentle slope | 100 mm pipe, 300 mm gravel, fabric wrap | Weeps every 3 m |
| Clay-loam soil, flat lot | 100 mm pipe, 450 mm gravel, fabric + sock | Weeps every 2 m, socked pipe |
| Steep slope above wall | 150 mm pipe, 600 mm gravel, geogrid | Surface drain at top of wall |
| High water table / wet area | 150 mm pipe with sock, 600 mm gravel | Daylight outlet or storm tie-in |
| Sun-exposed, dry climate | Standard 100 mm pipe, 300 mm gravel | Focus on UV-stable fabric |
The conditional logic is straightforward. Choose a wider gravel column and socked pipe when the soil is clay or the water table is high, because fines will migrate into clean stone fast. Choose a larger pipe and add a surface drain at the top of the wall when a slope above sends runoff down the back of the wall during storms. In dry, sun-exposed climates, drainage volume is lower, but UV-stable filter fabric matters more because the material degrades faster above grade. If budget is tight, do not skimp on the gravel and the fabric; those two do the most work per dollar in any soil.
What a Real Installation Actually Looks Like (and the Mistakes I Keep Seeing)
The site setup follows a predictable sequence. Excavate behind the wall to at least 300 mm wider than the wall itself, and to a depth that allows the pipe to sit at the footing level with a consistent 1 to 2 percent slope toward the outlet. Place the perforated pipe, then backfill with clean #57 stone up to about two-thirds of the wall height. Wrap the gravel column in filter fabric where it meets the native soil, then backfill the remainder with the excavated material, compacted in 150 to 200 mm lifts so the wall is not loaded unevenly.
The mistake I see most often is the filter fabric step. People wrap the pipe, then dump gravel directly against clay or loam without a fabric separator. For the first year or two it looks fine. By year three or four, fines have migrated into the stone, the pipe is half-full of silt, and the wall is suddenly loaded without hydrostat. The second most common mistake is the outlet. The buries go in, but they terminate behind a bush, at the same elevation as a planter, or covered by a future raised garden bed. Water finds the path of least resistance and, if there is no visible daylight, it finds the wall face instead. Compaction in 150 mm lifts with a plate compactor, not a jumping jack close to the wall, is the third thing that separates a wall that performs from one that tilts within a decade.
Limits, Edge Cases, and What to Do Next
Drainage reinforcement has limits worth naming honestly. It does not fix a footing that was poured on frost-susceptible soil, it does not replace structural rebar in a tall wall, and it does not save a wall built without proper compaction behind it. If your wall is taller than about 1.2 m, holds a surcharge, or sits in soil that stays wet most of the year, treat the drainage layer as part of a structural design and consult a structural engineer or a qualified contractor; the ranges above are for drainage, not for sizing the wall itself.
It is also worth saying: the cost of getting drainage right is small relative to the cost of the wall. A typical residential drainage stack adds roughly 5 to 15 percent to the total project cost in most markets, depending on soil and access. Rebuilding a failed wall is several times that, and usually means excavating the whole back side anyway. The economics are not subtle. A wall without drainage reinforcement is a wall with a hidden clock.
Choose a 100 mm socked pipe with 300 mm of #57 stone and filter fabric if your soil is sandy and your slope is gentle. A wall will perform for decades under typical residential loads with this baseline setup. Choose a 150 mm pipe with 600 mm of gravel and a surface drain at the top of the wall if you have a slope above sending runoff down behind the wall. Consult a structural engineer if your wall is taller than 1.8 m, holds a surcharge, or sits in soil with a seasonal water table. For a broader look at how drainage, ventilation, and slope interact behind a structural element, see the bathroom sub-systems drains boards ventilation guide. For concrete strength and curing topics that control how the wall’s base sets, the concrete mix design strength curing reference covers the basics.


![Kitchen Wall Removal: Load-Bearing Guide & Beam Sizing [12-Foot Span]](https://www.terasly.com/wp-content/uploads/open-concept-kitchen-wall-removal-guide-featured-2.jpg)