The kitchen with one ceiling light feels bright from across the room — and dark where it actually matters, between the upper cabinet and the benchtop, exactly where chopping, reading recipes, and handling hot pans happens.
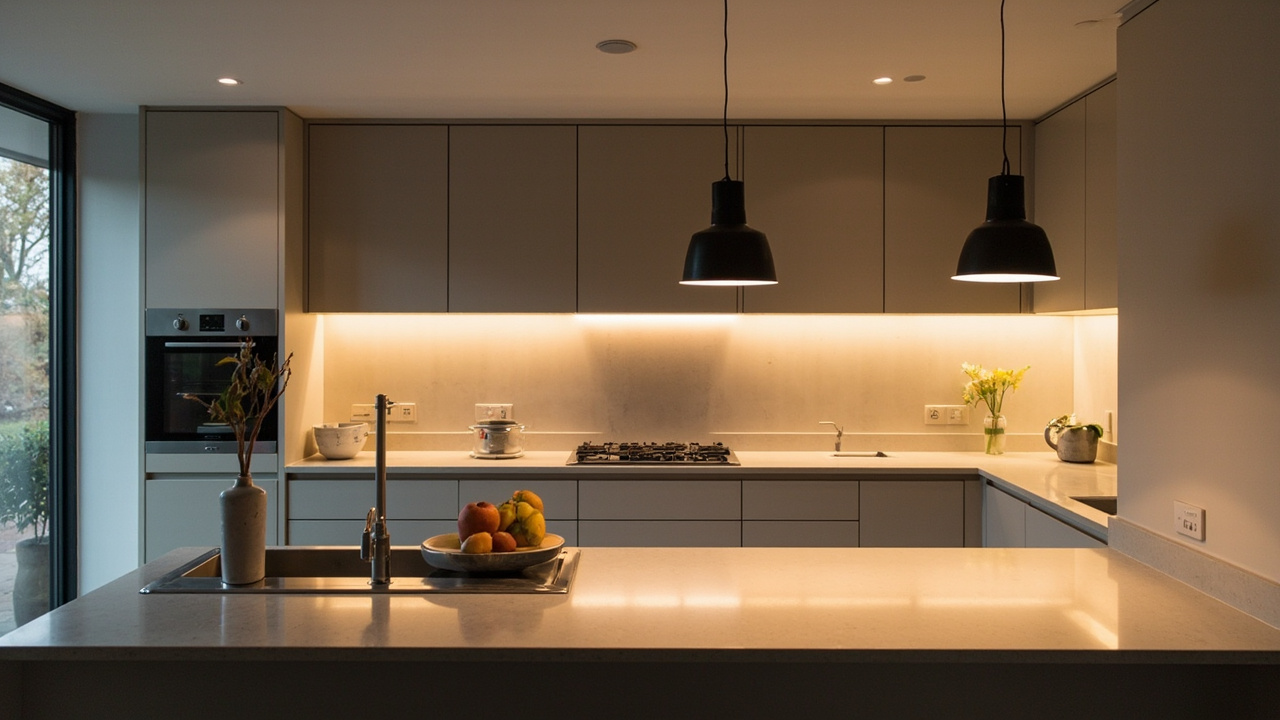
Ambient, task, and accent lighting are not just style choices. Each one solves a different problem: ambient fills the room, task removes the shadow on the work surface, and accent turns the kitchen into a room people want to gather in.
This page explains the three layers side by side, with the colour temperature, CRI, and IP rating trade-offs, and the kitchen layout where each layer earns its place.
Why One Ceiling Light Isn’t Enough
A single ceiling fixture creates a predictable problem: the upper cabinet blocks the light path and leaves a shadow zone across the benchtop. That shadow sits exactly where the chopping board, the recipe book, and the cook’s hands work. The cook leans forward to see what they’re doing, the recipe gets misread under dim light, and nobody connects the fatigue to the missing layer until the under-cabinet light goes in.
The mechanism is straightforward. Ambient lighting — the general ceiling layer — radiates outward and downward from a central point. Once it hits the underside of the upper cabinet, it stops. The benchtop working area below that line receives only reflected light from the backsplash and the counter surface itself, which is rarely enough for safe knife work or accurate colour judgement. Task lighting exists to fill that gap with directed light at the work surface, at eye-level brightness where the cook actually needs it.
The third layer, accent, addresses a different failure: a kitchen that is functionally lit but visually flat. Without accent lighting, the room works for cooking but doesn’t invite people to stay. The three layers together — ambient for the room, task for the work, accent for the atmosphere — cover the full range of kitchen use without any single layer trying to do all three jobs.
Ambient Lighting — The Ceiling Layer
Ambient lighting is the general illumination that fills the room evenly. Its job is to eliminate dark corners, provide safe movement, and set the overall brightness level. The fixture type depends on ceiling height dependency: a standard 2.4 m ceiling works with recessed downlights spaced 90–120 cm apart, while a ceiling above 2.7 m often needs a surface-mount ceiling fixture or a pendant over the island to bring the light source closer to the work plane.
The critical trade-off is colour temperature, measured in Kelvin. Warm 2700K feels residential and comfortable but can make food look dull under low light. Cool 4000K feels clinical and makes warm timber tones look grey — a common renovation mistake when the same downlight goes into the kitchen and the living room without adjustment. Neutral 3000K is the practical default for most kitchens: it renders food accurately, works with both warm and cool cabinetry finishes, and dims well for evening use.
What happens next: once the ambient layer is set at 3000K, every other layer in the kitchen should match or sit within one step (2700K–3500K). Mixing 2700K pendants with 4000K downlights in the same sightline creates a visual split that reads as a mistake even if nobody can name it.
Task Lighting — The Benchtop Layer
Task lighting targets the shadow zone under the upper cabinet where ambient light doesn’t reach. The standard solution is an LED strip or linear light mounted to the underside of the cabinet, positioned to wash the benchtop working area without shining into the cook’s eyes. The quality of that light matters: CRI 90+ (colour rendering index) means the light renders food colours accurately — raw meat looks raw, herbs look fresh, and a burnt sauce reads as burnt rather than dark red.
In the field, the kitchen that gets the LED strip mounted at the front edge of the upper cabinet returns for a repositioning job within two years — the harsh reflection on the polished stone benchtop makes the surface unusable for food prep.
The fix is positioning. Mount the strip at the back edge of the cabinet, close to the wall, so the light washes down across the work surface and the reflection bounces away from the cook rather than toward them. For glossy benchtops — polished stone, high-gloss laminate, glass — this positioning is the difference between a task light that works and one that creates a mirror effect across the entire work area. In-drawer lighting and a hand-wave sensor switch add function for clean-hands access during cooking, though the sensor needs to be positioned where it won’t trigger from normal movement past the cabinet.
What to check next: confirm the strip’s CRI rating on the spec sheet, not just the packaging. Many budget LED strips claim CRI 80+ but deliver 70–75 in practice, which is enough for ambient fill but not for accurate food colour judgement at the benchtop.
Accent Lighting — The Decorative Layer
Accent lighting isn’t decoration — it’s the layer that turns the kitchen from a workspace into a room people want to be in. A pendant light over the island or dining table, in-cabinet lighting behind glass-front display cabinets, and plinth lighting along the kickboard all serve this layer. The pendant defines the island as a gathering point; the in-cabinet light shows off the glassware; the kickboard light functions as a night-light at 5% brightness for midnight trips without switching on the full ceiling.
The colour temperature for accent should sit warm: 2200K–2700K for pendants and in-cabinet, matching or slightly warmer than the ambient layer. Dimmer compatibility is non-negotiable here — accent lighting at full brightness over an island at 10 pm is harsh and unwelcoming. A pair of pendants at 2700K, dimmed to 40%, does more for the kitchen’s evening use than any upgrade to the cabinetry itself.
The trade-off: accent circuits add cost and complexity. In a small kitchen under 10 m², one ambient circuit plus one task circuit covers 80% of use cases. The accent layer is a pendant over the dining bench if there’s room. In a large open-plan kitchen, three or four circuits with a scene controller — cooking, cleaning, entertaining, night — is the difference between a kitchen that works and a kitchen that’s always fighting the lighting.
IP Rating and Wet-Zone Rules
The IP rating (ingress protection) determines how a fitting handles moisture and dust. In a kitchen, the wet zone — above the sink and within 60 cm of the tap — demands IP44 minimum. The cooktop zone, where steam and grease combine, needs IP65 and a heat-resistant fitting rated for the temperature range directly above a gas or induction cooktop. Standard IP20 downlights are fine for the ceiling area away from both zones.
The risk is corrosion. A standard downlight above the sink fails within two to three years because steam exposure corrodes the driver and the terminal block. The fitting still lights up intermittently, so the homeowner lives with flickering for months before it dies completely. The fix is an IP44-rated fitting above the sink and an IP65 in the cooktop zone — a small cost difference at install, a large cost difference at year three when the alternative requires a licensed electrician to replace fittings in a ceiling that’s already painted and finished.
A bathroom-rated fitting is sometimes used near the sink as a shortcut, but the two zones have different test conditions — bathroom ratings cover direct water splash, while kitchen ratings need to handle steam and grease together. Check the spec sheet for both the IP number and the intended application zone. For any new circuit in Australia, AS/NZS 3000 wiring rules apply — engage a licensed electrician, not a handyman, for the installation.
Combining the Three Layers
The combination depends on the kitchen layout. A small kitchen under 10 m² with one run of cabinetry needs one dimmable ambient circuit and one task circuit — the accent layer is optional and usually limited to a single pendant if there’s a dining bench. A large kitchen with an island, a separate pantry, and an open-plan living area needs multiple circuits with scene control: one for ambient, one for task, one for accent, and ideally a separate circuit for the island pendants so they can run independently.
An open-plan kitchen-living space adds a bridging requirement: the pendant over the island visually connects the kitchen to the living area, so its colour temperature and dimmer level need to match the living room’s ambient layer. A kitchen without upper cabinets — common in Scandinavian-style layouts — shifts the task lighting burden to the ambient layer, which then needs to work harder: more downlights, closer spacing, and a higher lumen output to eliminate benchtop shadows that upper cabinets would otherwise block.
The night-light function deserves its own mention. Plinth lighting at 5% brightness, triggered by a motion sensor, covers midnight kitchen trips without the shock of full ceiling lights. It’s a small addition — one low-wattage circuit, a sensor, and LED strip behind the kickboard — but it’s the detail that makes a kitchen feel considered. For more on how layout drives these decisions, see kitchen layout types.
What to Specify in Writing
The lighting spec that just says “LED downlights, kitchen” is a red flag. That spec leaves colour temperature, CRI, IP rating, dimmer type, and circuit count to whoever is holding the drill on install day — and the result is almost always a mix of whatever’s in the van.
Specify these five items in writing before the electrician starts. First, colour temperature consistency: one Kelvin value for the whole kitchen, or a defined split (3000K ambient, 2700K accent) with the zones marked on the plan. Don’t mix 2700K and 4000K in the same sightline. Second, CRI specification: CRI 90+ minimum for the benchtop task area, CRI 80+ acceptable for ambient-only zones. Third, IP rating by zone: IP44 above the sink, IP65 in the cooktop zone, IP20 elsewhere. Fourth, the dimmer type — leading-edge vs trailing-edge — which must match the LED driver or the lights will flicker at low levels. Fifth, the circuit layout: how many switches, where they sit, and which fittings are on each circuit.
For Australia, AS/NZS 3000 wiring rules apply to all new circuits. Engage a licensed electrician, not a handyman, for any work that involves a new circuit, a new switch point, or a connection to the mains beyond a like-for-like fitting swap. The spec errors that show up in warranty claims — mismatched dimmers, mixed colour temperatures, IP20 in wet zones — are almost always the result of a verbal brief rather than a written one. For the full list of spec mistakes and their cost implications, see common lighting mistakes and the kitchen renovation cost breakdown.




![Deck Railing Code: Height & Baluster Spacing Guide [IRC ]](https://www.terasly.com/wp-content/uploads/deck-railing-code-height-baluster-featured.jpg)